How Virtual Staging Works: Step-by-Step Process
Virtual staging transforms empty property photos into beautifully furnished spaces through a combination of photography, AI technology, and design principles. This guide explains exactly how the process works—from capturing the initial photo to delivering the final staged image.
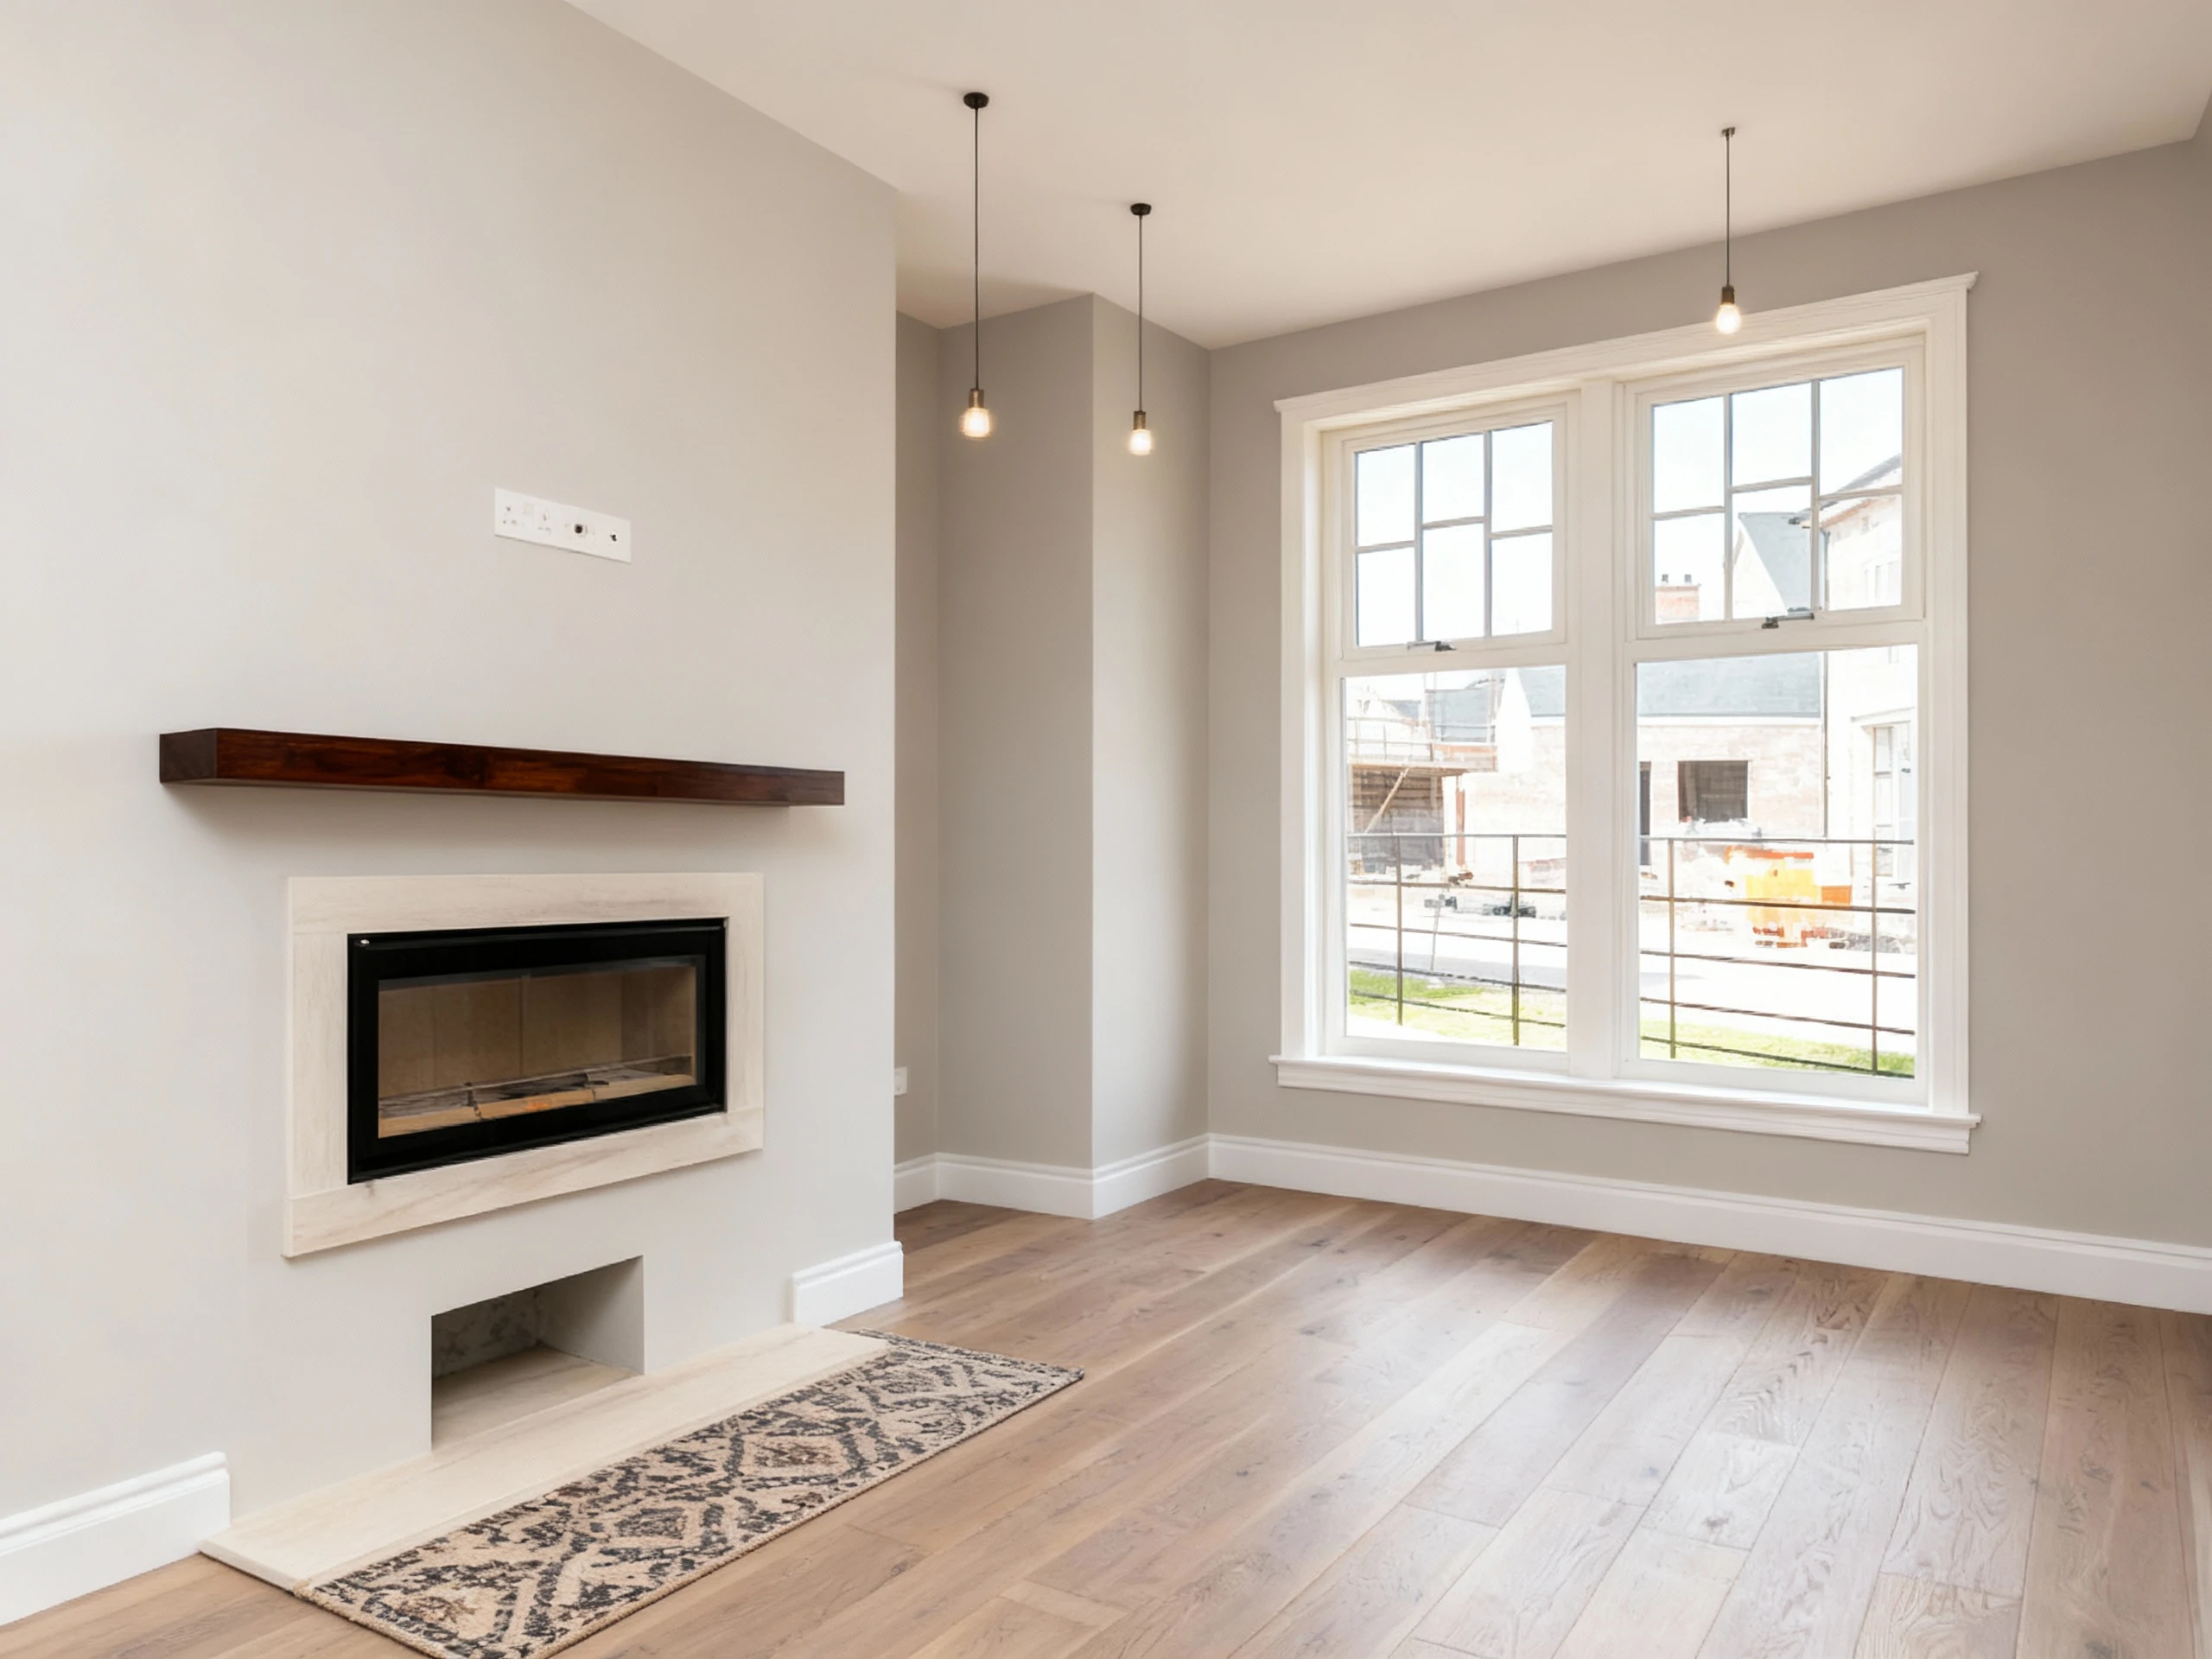
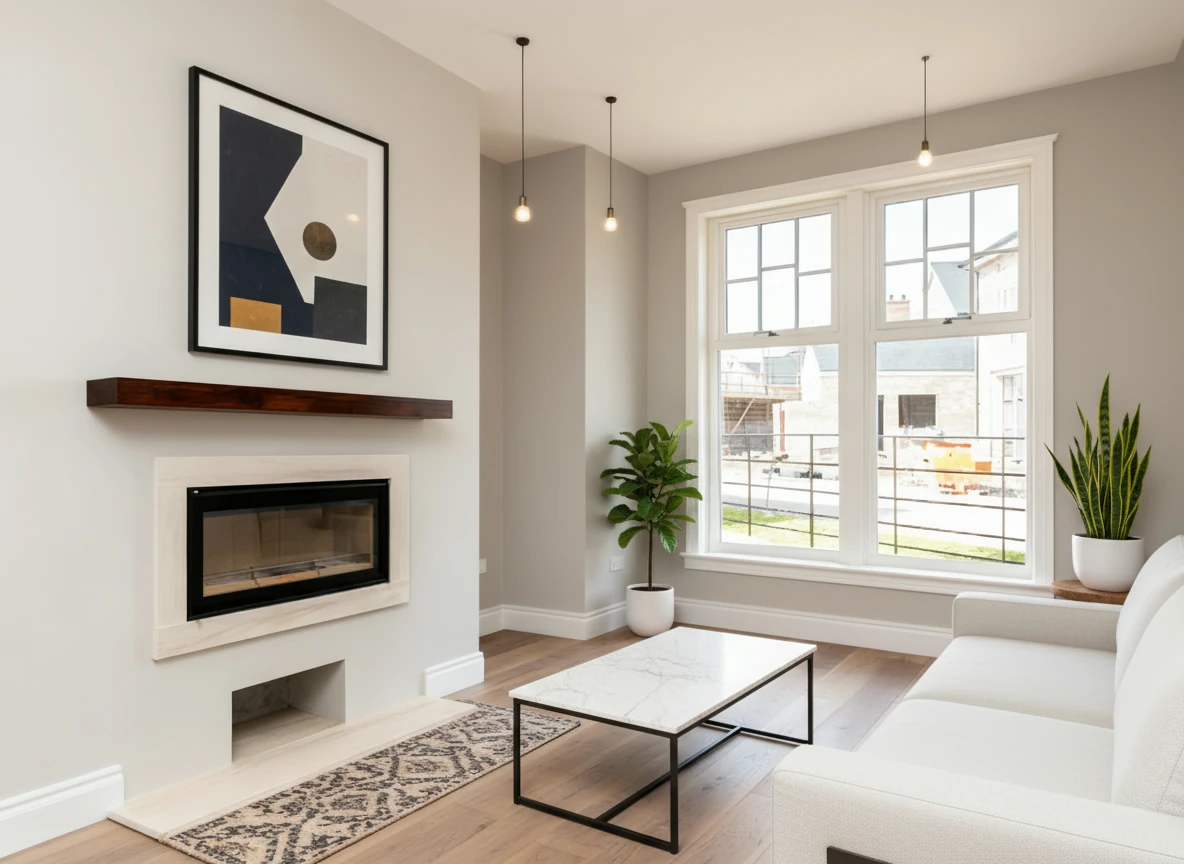
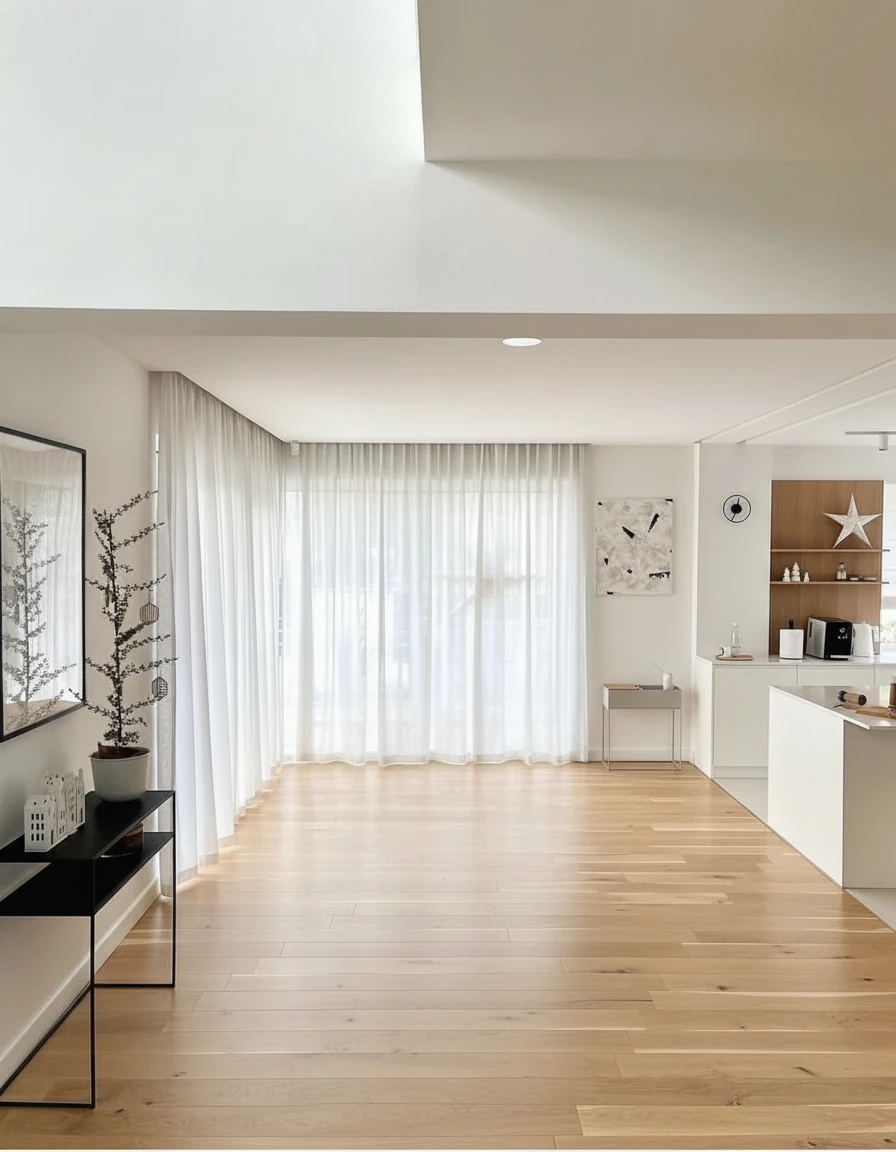
Create a photo of the same living room, virtually staged in a Modern style. Add a sleek white sofa to the right side of the photo, a minimalist coffee table in the center of the room, a large abstract art piece on the main wall, and some indoor plants.
The Virtual Staging Workflow (Overview)
At its core, virtual staging follows this sequence:
- Photo Capture → Professional real estate photography of empty spaces
- Image Upload → Uploading photos to a virtual staging platform
- Room Specification → Defining room type, style preferences, and requirements
- AI Generation → Automated furniture placement and rendering
- Quality Review → Checking results for accuracy and realism
- Delivery & Use → Downloading and publishing staged photos
Modern AI-powered platforms like StagerGo complete this entire process in 30 seconds to 2 minutes per image, compared to 48-72 hours with traditional manual virtual staging services.
More importantly: The speed enables a completely different workflow—you can test multiple styles, gather feedback, and iterate all within the same day, making staging a dynamic part of your marketing strategy rather than a one-time commitment.
Step 1: Photo Capture & Preparation
Virtual staging quality starts with the input photography.
Professional Photography Requirements:
Camera Settings:
- Focal length: 24mm-35mm (18-24mm for very small rooms)
- Aperture: f/8-f/11 for proper depth of field
- ISO: As low as possible (100-400) to minimize noise
- White balance: Daylight or custom for accurate colors
- Format: Shoot RAW for maximum editing flexibility
Composition Best Practices:
- Shoot from room entry points or natural viewpoints
- Keep walls straight and vertical (avoid tilting)
- Include the entire room in the frame
- Shoot at eye level (approximately 5 feet from floor)
- Use natural light whenever possible
Room Preparation:
- Remove obvious clutter and personal items
- Clean windows, floors, and visible surfaces
- Turn on all lights for even illumination
- Open curtains/blinds for natural light
- Remove small furniture if the room feels crowded
Photo Quality Checklist:
✅ Sharp focus throughout the frame
✅ Proper exposure (not too bright or dark)
✅ Straight lines (walls perpendicular, floor level)
✅ Good color balance (not too yellow or blue)
✅ Minimal distortion (no wide-angle warping)
✅ High resolution (minimum 2000 pixels wide)
Pro tip: If your photos have issues (poor lighting, clutter, outdated elements), run them through image enhancement tools before virtual staging for better results.

Enhance this interior photo using an HDR-style edit to balance indoor and outdoor exposure. Brighten the interior to reveal furniture details while preserving the view outside the windows with natural dynamic range, make the interior much brighter, almost too bright. Adjust contrast and highlights to create a crisp yet realistic look. Improve color balance and sharpness for a clean, professional finish. Subtly boost warmth and daylight tones to make the space feel inviting and well-lit, with clear textures, accurate whites, and smooth tonal transitions between light and shadow. lower the brightness of the sky, so we can see blue sky.
Step 2: Uploading & Room Type Selection
Once you have quality photos, the virtual staging process begins:
Upload Process:
- Select images – Choose which rooms need staging
- Upload to platform – Drag and drop or select files
- Specify room type – Living room, bedroom, kitchen, office, etc.
- Choose property type – Residential or commercial
Why room type matters: The AI needs to know what type of room it's staging to select appropriate furniture. A bedroom needs a bed, nightstands, and dresser—not a dining table.
Property Classification:
Residential:
- Living rooms
- Bedrooms
- Kitchens
- Dining rooms
- Home offices
- Bathrooms
Commercial:
- Office spaces
- Retail stores
- Restaurants
- Hotel lobbies
- Conference rooms
The platform uses this classification to pull from appropriate furniture libraries and design templates.
Step 3: Design Style & Furniture Selection
This is where your creative vision shapes the final result.
Popular Design Styles:
Modern / Contemporary
- Clean lines, minimal ornamentation
- Neutral colors with bold accents
- Metal, glass, and polished surfaces
- Open, uncluttered spaces
Traditional / Classic
- Ornate details, classic silhouettes
- Rich wood tones
- Patterned fabrics, formal arrangements
- Warm, inviting atmosphere
Scandinavian / Minimalist
- Light colors, natural materials
- Functional, simple furniture
- Lots of white and pale woods
- Emphasis on natural light
Coastal / Beach
- Light blues, whites, sand tones
- Natural textures (rattan, linen)
- Casual, relaxed furnishings
- Beach-inspired decor
Industrial / Urban
- Exposed materials (brick, concrete, metal)
- Raw, unfinished textures
- Functional, utilitarian pieces
- Neutral color palette with dark accents
Mid-Century Modern
- Retro 1950s-60s aesthetic
- Organic shapes, tapered legs
- Warm wood tones
- Bold, geometric patterns
Style Selection Strategy:
Choose styles based on:
- Neighborhood demographics – What do local buyers expect?
- Property age – Modern homes → contemporary; older homes → traditional
- Price point – Higher prices can support more unique styles
- Market trends – What's selling in your area?
Pro tip: When in doubt, choose Modern or Scandinavian styles—they appeal to the broadest audience and photograph well.
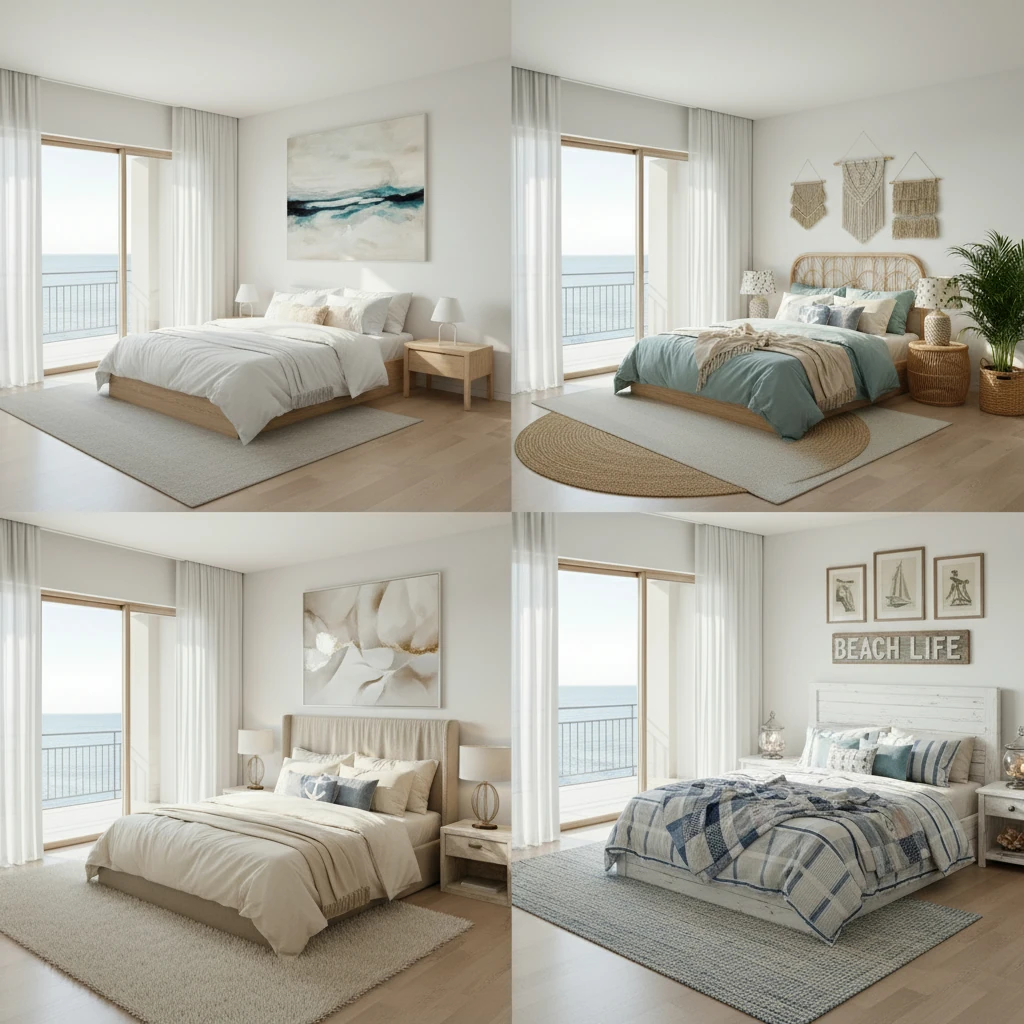
Furnish the bedroom with a bed and additional furniture and decorations, and create a 2x2 image showing four variations of the same coastal bedroom in different interior design styles. Use consistent room layout and lighting, but vary textures, furniture, and decor to reflect each style. The four styles are: 1. Modern Coastal – light oak wood, white linen bedding, minimal decor, ocean-inspired art. 2. Bohemian Coastal – rattan furniture, layered textiles, soft blue-green palette, plants and woven accents. 3. Luxury Coastal – high-end finishes, soft beige and ivory tones, marble nightstands, large windows with seaside view. 4. Rustic Beach Cottage – weathered wood furniture, nautical elements, striped bedding, casual cozy feel. Include natural daylight, soft shadows, and an airy seaside atmosphere. Keep the room window/building structure unchanged in all variations
Step 4: How AI Virtual Staging Technology Works
Behind the scenes, AI virtual staging uses sophisticated multi-modal understanding and reasoning to generate realistic results.
The Technical Process:
1. Image Analysis:
- AI identifies room boundaries (walls, floor, ceiling)
- Detects existing features (windows, doors, fixtures)
- Analyzes lighting conditions and perspective
- Calculates room dimensions and scale
2. Furniture Placement:
- Decides on appropriate furniture based on the specified style
- Calculates correct sizes based on room scale
- Positions furniture following design principles
- Ensures proper spacing and movement flow
3. Rendering:
- Generates furniture with matching lighting
- Creates realistic shadows and reflections
- Blends textures naturally with the space
- Adjusts colors to match ambient lighting
4. Post-Processing:
- Refines edges and transitions
- Enhances overall image quality
- Ensures photorealistic final result
- Sometimes even reflects on the result and decides if it needs revision
What Makes Good AI Staging?
Realistic shadows: Furniture casts shadows that match the room's lighting
Proper perspective: Items follow the room's vanishing points
Accurate scale: Furniture is correctly sized for the space
Natural textures: Materials look realistic, not computer-generated
Color harmony: Furniture colors complement the room's existing palette
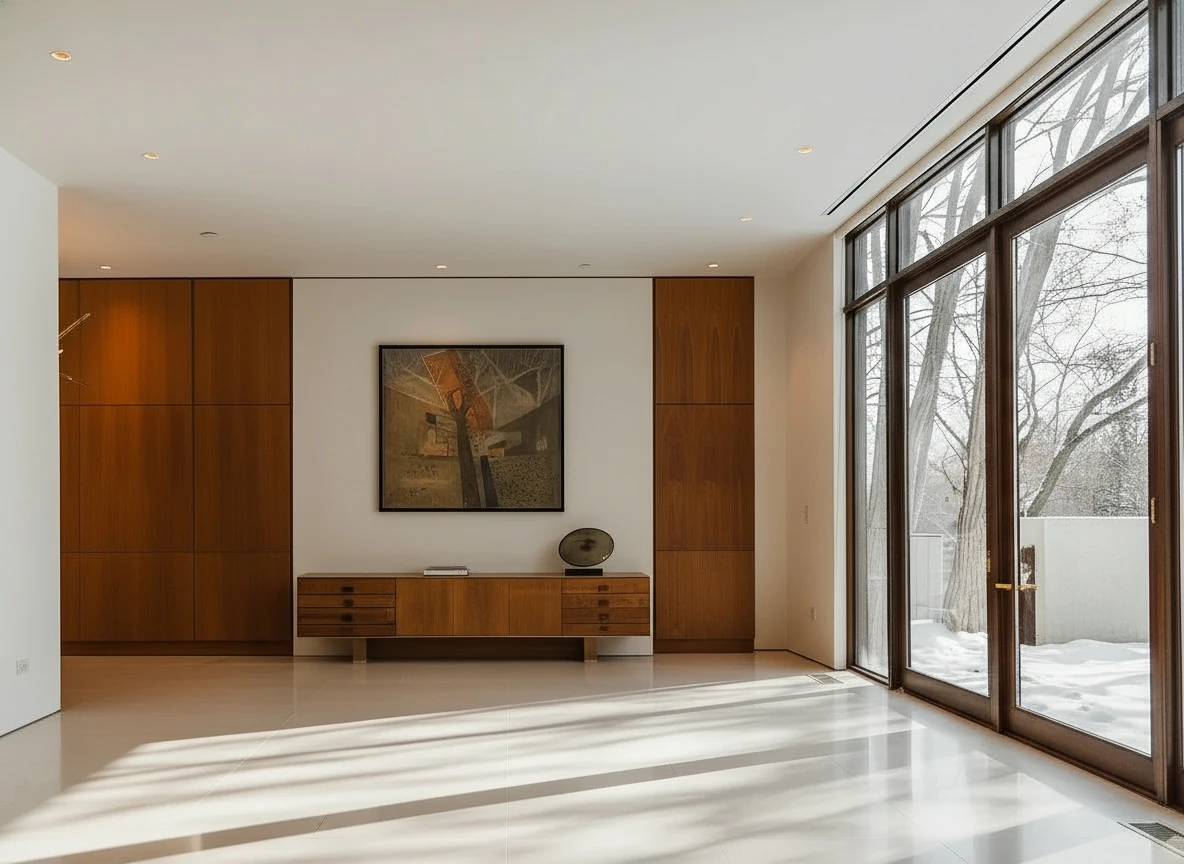
Furnish the room with a long beige sofa on the left facing a rectangular walnut coffee table (1.6m × 0.8m) centered on a light cream rug. Add two black leather lounge chairs with wooden frames opposite the sofa, one angled toward the windows. Behind, place a low walnut sideboard spanning the width between two tall built-in wood panels, decorated with sculptural vases and a gramophone. Mount a large abstract artwork above the sideboard. Finish with a warm table lamp on the side table near the sofa, soft downlights, and full-height glass doors along the right wall. Make sure the placement of furnitures are reasonable based on the room layout
Step 5: Advanced Options & Customization
Modern virtual staging platforms offer additional controls:
Layout Customization:
Furniture density:
- Minimal – Sparse, open feeling (modern aesthetic)
- Standard – Comfortable, lived-in look (most popular)
- Furnished – Fully decorated, magazine-ready
Focus areas:
- Emphasize seating areas in living rooms
- Center beds in bedrooms
- Highlight kitchen islands or dining areas
Prompt-Based Control:
AI platforms like StagerGo allow text prompts for specific requests:
Example prompts:
- "Add a gray sectional sofa facing the windows with a round coffee table"
- "Include a home office desk with ergonomic chair and floating shelves"
- "Stage with coastal style: white sofa, blue accent pillows, driftwood coffee table"
The more specific your prompt, the more control you have over the final result.
Multiple Variations:
Generate multiple versions to:
- Test different furniture arrangements
- Try various color schemes
- Compare design styles
- Present options to clients
Most AI platforms let you create unlimited variations at no extra cost.
Step 6: Quality Control & Review
Before publishing, review your staged photos:
Quality Checklist:
✅ Furniture scale – Does everything look appropriately sized?
✅ Lighting consistency – Do shadows match the room's light sources?
✅ Perspective accuracy – Does furniture follow the room's perspective?
✅ Color harmony – Do colors work well together?
✅ Style consistency – Does it match your target buyer?
✅ MLS compliance – Are structural elements unchanged?
Common Issues to Watch For:
❌ Inconsistent room structure – This might happen if the provided image doesn't have enough room for the ideal furniture layout
❌ Wrong scale – Furniture too large or too small for the space
❌ Style mixing – Furniture from different design styles
❌ Over-staging – Too much furniture, feels crowded
If you spot issues, regenerate with adjusted parameters or try a different style. In most cases, bad input image results in worse output, so use the image enhance tool before stage the room.

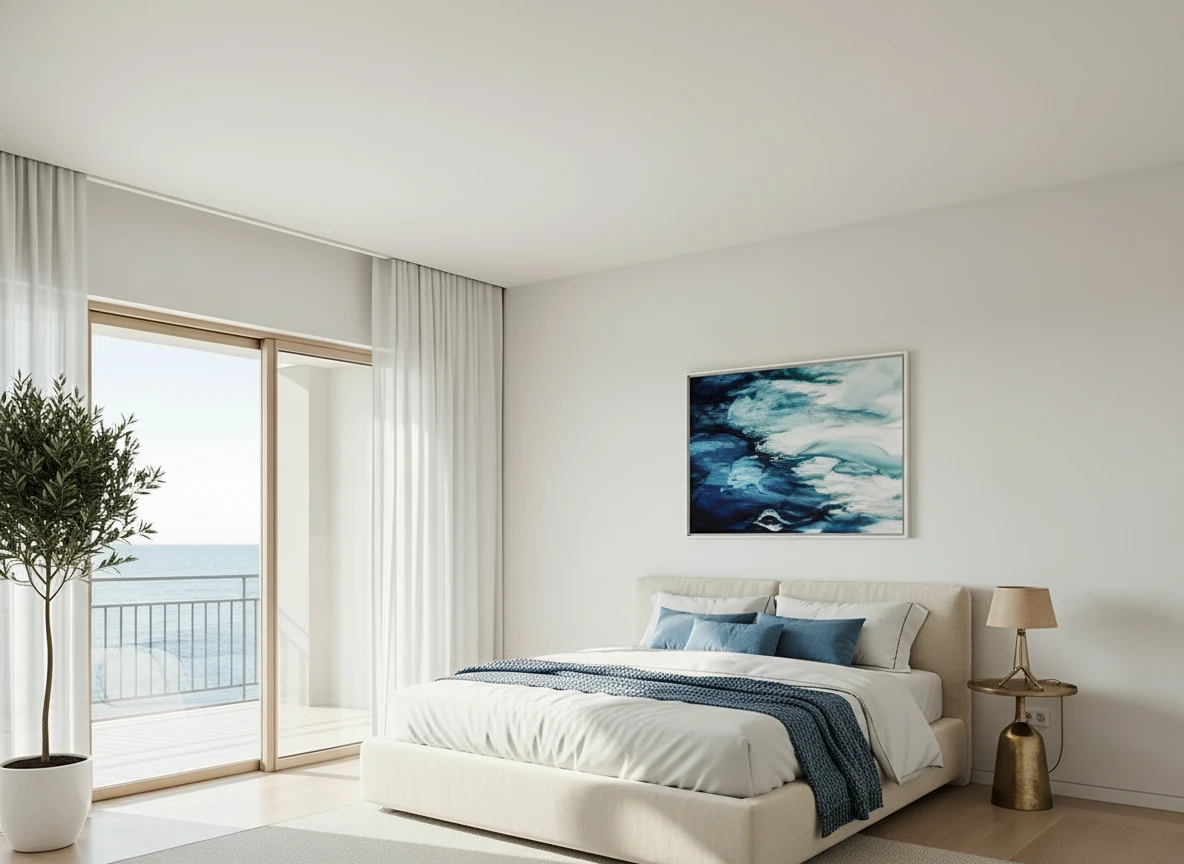
Furnish the serene bedroom with a low-profile cream platform bed centered on a large textured beige rug. Dress the bed in white linens with a soft blue throw and matching accent pillows for contrast. Place a tall potted olive tree in a white planter beside the sliding glass doors, and a small brass bedside lamp on the right. Hang a framed ocean-themed artwork above the bed to echo the seaside view. Keep floor-to-ceiling white curtains along the balcony doors, light wood flooring, and minimal decor to maintain an airy, coastal feel.
Step 7: Delivery & File Management
Once satisfied with results:
Download Options:
Resolution choices:
- MLS standard: 1200-2000px wide (sufficient for online listings)
- High resolution: 3000-4000px wide (print materials, large displays)
- Original quality: Maximum available resolution
File formats:
- JPEG: Universal compatibility, smaller file sizes
- PNG: Higher quality, larger files, supports transparency
File Organization:
Create a systematic filing structure:
Property Address/
├── Originals/
│   ├── 01-living-room-empty.jpg
│   ├── 02-bedroom-empty.jpg
│   └── ...
├── Staged/
│   ├── 01-living-room-staged.jpg
│   ├── 02-bedroom-staged.jpg
│   └── ...
└── MLS/
    ├── Set A (with staged)
    └── Set B (without staged)
Pro tip: Always keep original unstaged photos. Some MLSs require including them, and you may need them for disclosure or comparison purposes.
Check out this file management tool Tokie.is if you want to have custom labelling on your images.
Step 8: Publishing & Disclosure
When uploading to MLS and marketing platforms:
MLS Requirements:
- Add disclosure – Include "Virtually Staged" in captions or description
- Mix photos – Alternate staged and unstaged images
- Use watermarks – Some platforms add "Virtual Staging" overlays
- Follow local rules – Check your MLS's specific requirements
Disclosure Best Practices:
In listing description:
"Photos are virtually staged to showcase the property's potential.
Actual rooms are currently vacant."
In photo captions:
"Living Room (Virtually Staged)"
"Master Bedroom (Virtually Staged)"
On social media:
#VirtualStaging #DigitallyStaged
Clear disclosure builds trust and prevents misunderstandings during showings.
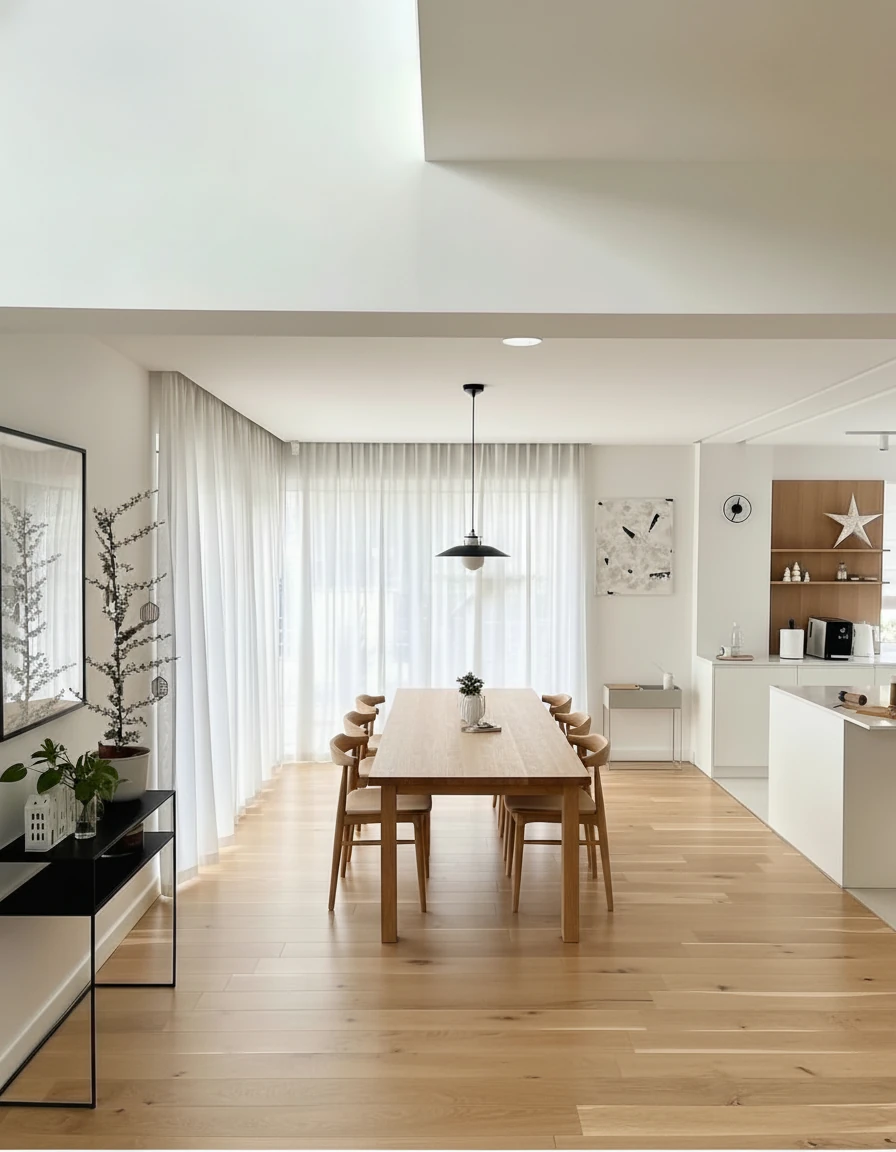
Furnish the dining area with a long natural oak dining table (3m × 1m) centered on the wooden floor, surrounded by eight matching curved-back oak chairs. Above the table, install a pair of minimalist black-and-white pendant lights aligned along the centerline. Add sheer white curtains across the full window wall for soft daylight diffusion. Place a slim black console with potted plants and small decor on the left wall, and keep the adjoining kitchen open with white cabinetry and oak shelving for a warm, cohesive look.
Complete Workflow Timeline & Flexibility Comparison
Here's how long each step takes—and how workflow flexibility differs:
| Step | Traditional Manual | AI Virtual Staging |
|---|---|---|
| Photo preparation | 1-2 hours | 1-2 hours |
| Upload & setup | 15-30 minutes | 2 minutes |
| Editing/generation | 48-72 hours | 30-60 seconds |
| Test multiple styles | N/A (commit upfront) | 5 minutes for 5 styles |
| Revisions | +$15-25 each, +24 hours | Same price, instant |
| Style pivot (market feedback) | Restart ($30-75/image) | Regenerate ($0.05-0.30/image) |
| Final delivery | 3-5 days total | Same day |
Total time from photography to MLS:
- Traditional manual: 3-5 days, committed to initial style
- AI virtual staging: Same day, with 5+ style options tested
The workflow transformation:
- Traditional: Linear process → commit → wait → hope it works
- AI: Iterative process → test → gather feedback → refine → respond to market
This flexibility means you're not gambling on a style choice—you're responding to what buyers actually want.
Workflow Strategies for Maximum Impact
For Solo Agents:
Traditional bottleneck: Wait 3-5 days for staging, hope the style works, expensive to change
AI workflow advantage:
- Shoot property in morning
- Generate 5 style variations by afternoon ($2-5 total)
- Send options to seller/broker for feedback
- Refine based on input instantly
- Publish to MLS same day
- Monitor performance for 7-10 days
- If underperforming: pivot to different style (same low cost, 5 minutes)
Key benefit: Turn staging into a responsive marketing tool, not a one-time bet.
For Teams & Brokerages:
Traditional bottleneck: Designer scheduling, bottlenecks when multiple agents need staging simultaneously
AI workflow advantage:
- Any team member can generate staging (no designer dependency)
- No scheduling conflicts – instant availability 24/7
- Consistent quality across all agents
- React to market feedback as a team
- Reallocate designer time to high-value custom work
Key benefit: Eliminate workflow bottlenecks, empower every agent to stage instantly.
For High-End Listings:
Traditional challenge: Custom looks are expensive to get wrong, revisions costly
AI workflow advantage:
- Generate multiple custom style directions ($5-10)
- Present 3-5 options to seller before deciding
- Refine winning direction with specific prompts
- Iterate until seller loves it (no revision fees)
- If market feedback suggests change: pivot without cost penalty
Key benefit: High-end customization without high-end commitment risk.
For Market-Responsive Agents:
Scenario: Listing gets 20 online views but no showings in first week
Traditional response: Stuck with current staging, expensive to change
AI response: Generate new style targeting different buyer demographic (5 minutes, $5-10)
Scenario: Buyer feedback says "feels too formal"
Traditional response: Either live with it or pay $240+ to restage
AI response: Regenerate with "casual, inviting" style (2 minutes, same low cost)
Key benefit: Marketing agility—adapt your listing presentation based on actual market response.
Tips for Optimal Results
For Photographers:
- Shoot multiple angles – Give clients flexibility to test different crops
- Bracket exposures – Ensures at least one perfect exposure
- Use tripod – Guarantees straight, sharp images
- Check white balance – Avoid color casts
- Capture variations – Different lighting conditions = different staging possibilities
For Agents:
- Start with multiple styles – Test 3-5 looks upfront (costs $2-5 total)
- Gather feedback before committing – Show options to colleagues/sellers
- Monitor early performance – First 7 days tells you if style resonates
- Don't fear pivoting – Changing styles costs same as original
- Document what works – Build style playbook based on actual results
For Sellers (DIY):
- Invest in quality photos – Results are only as good as inputs
- Test multiple aesthetics – Don't guess—see what works
- Get market feedback – Ask your agent about showing comments
- Iterate based on data – Low cost enables testing
- Disclose clearly – Build trust with transparency
Common Workflow Questions
How many photos should I virtually stage per listing?
Recommended minimum: 3-5 key rooms
- Living room (always)
- Master bedroom (always)
- Kitchen (if empty)
- Dining room (if separate)
- Home office (if applicable)
Maximum: 8-12 rooms for larger properties
Should I stage every photo?
No. Mix staged and unstaged photos:
- Lead with strongest staged images
- Include unstaged photos for disclosure
- Leave exterior shots unstaged (unless doing virtual renovations)
- Skip utility rooms (laundry, mechanical, garage)
Can I stage already-furnished rooms?
Yes, but it requires furniture removal first, then restaging. This is called "furniture replacement" and works well for:
- Updating outdated furniture
- Removing owner's personal style
- Depersonalizing occupied properties
What if I don't like the result?
With AI virtual staging: Regenerate instantly at the same low cost ($0.05-$0.30)
- Try different style selection
- Modify prompts
- Adjust furniture density
- Test alternative layouts
- Takes 30-60 seconds per attempt
With manual services: Request revision for $15-25 + 24 hour wait, or start over
The flexibility advantage: AI makes staging an iterative process. You don't need to "get it right" the first time—you can explore until you find what works. This fundamentally changes how you approach staging strategy.
How do I handle changing market feedback?
Scenario: Listing is getting views but no showings. Feedback says "too modern."
With AI: Generate "transitional" or "traditional" style in 5 minutes for $2-5. Update MLS. Monitor response.
With manual: Pay $240-400 to restage entire property, wait 48-72 hours, hope new style works.
The workflow difference: AI lets you be responsive to actual buyer behavior, not locked into upfront guesses.
Next Steps: Try Virtual Staging
Now that you understand how virtual staging works, you're ready to stage your first property.
The fastest way to get started:
- Gather your photos – Professional shots of empty rooms
- Try StagerGo below – Upload, select style, generate
- Review and refine – Try variations until perfect
- Download and publish – Add to MLS with proper disclosure
Most agents complete their first full property in under 30 minutes.
Related Resources
- What Is Virtual Staging? – Complete definition guide
- Virtual Staging Pricing – Cost breakdown
- Virtual Staging vs Physical – Comparison guide
- Virtual Staging Service – Professional AI staging platform